
Step 8: Create a WordPress Menu
WordPress Menu: Whereas when you hit the “Publish” button on a Post, and it goes straight onto your blog, a Page needs to be added to your site’s navigation (or menu) if you want it to show up.
So, the first thing to do is to create those pages for your site. Next, you’ll want to go to the Appearance tab and select “Menus.” This is where you will build and manage your site’s navigation.
First, let’s look at the menu selection dropdown. However, if your theme automatically creates secondary or footer menus for you, be sure to select the one you want to create/edit here. Next, let’s look at the sidebar options.
So, the first thing to do is to create those pages for your site. Next, you’ll want to go to the Appearance tab and select “Menus.” This is where you will build and manage your site’s navigation.
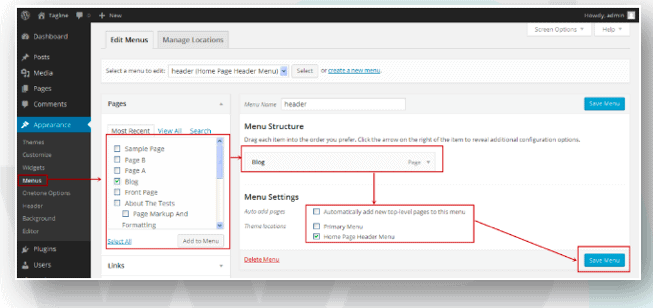
When you expand these tabs, you’ll be presented with pages, posts, and other types of content that already exist on your site. Now, it’s time to create your menu.
Click on the pages checkbox next to the page (or pages) you want to add to the sidebar. Then click on the “Add to Menu” button. You’ll see those pages then show up under Menu Structure.
Within this interface, you can now drag-and-drop your pages and design your menu to appear; however, you’d like it to. You can also change the page labels that appear in the navigation. One other thing to point out here is the Menu Settings box at the bottom.
If you know that you’ll be adding new pages regularly to your website and don’t want to have to repeat this process every time, you can click on the “Automatically add new top-level pages to this menu” option to streamline your process. When you’re done setting up your menu, save your changes.

“Let’s Interact: Write me a question if you have one, or ask anything”